Technical
Thursday, 9 February 2012
Wednesday, 8 February 2012
Systems Crochet
 |
| Grid made from yarn and pins |
 |
| (detail) |
 |
| In progress |
 |
| Finished |
 |
| Suspended from the middle point |
 |
| Worms-eye view |
ADD SCAN FROM NOTEBOOK
Crocheting with a system, mostly determined by rolling dice. Pinned to the wall as I reached each new co-ordinate. The system looked too rigid and structured, by hanging the piece I challenge the preconception of systems art. Juxtaposition of structure and natural flow/drape.
Tuesday, 7 February 2012
Hyperbolic Crochet llll
 | |
| Racetrack formation |
 |
| Curving in on itself |
 |
| Slight ruffling, due to 1 in 2 Increase |
The racetrack formation requires a specific start to enable the pattern to work:
- Ch10, turn
- 1 Treble in each
- 5 Trebles in end stitch
- Continue AROUND now using a 1 in 2 increase
- Continue increasing 1 in every 2 stitches until yarn runs out
Hyperbolic Crochet lll
 |
| Starting in a spiral formation |
 |
| Sample starting to look irregular |
 |
| Definate shape starting to emerge |
 |
| Well established sample, with the numbers that have formed it |
Crocheting in a spiral formation (round), putting a pre-determined amount of stitches into each stitch. Rolling a dice and following the numbers exactly led to this irregular sample.
Hyperbolic Crochet ll
 |
| Starting with Ch10, turn, 1 Treble into each, turn, 2 Treble in each |
 |
| Turn, 2 Treble in each stitch (repeat for the rest of the sample) |
 |
| The sample is beginning to ruffle slightly |
 |
| Sample when laid flat |
 |
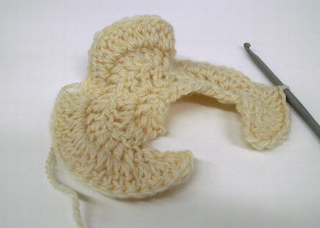
| Sample allowed to curl |
 | |
| Finished sample, one ball of Rowan Pure Life DK |
Hyperbolic crochet can be worked in several different formations. Rather than working in the round, I have chosen to work in rows. Working in rows means a back and forth motion, rather than a continuous line. Turning at the end of each row gives the fabric a different texture compared to when it is worked in the round.
Saturday, 14 January 2012
Photoshop Polaroid
As discussed in my visual diary, I have decided to Photoshop my own photographs into Polaroid frames due to the cost of the obsolete technology.
Start by taking photographs on a digital camera, you are able to make more convincing images with photographs taken from a greater distance than is conventional.
Open the chosen image in Photoshop, and 'Select All' (keyboard shortcut for mac - CMD+A), then 'Copy' (keyboard shortcut for mac - CMD+C).
Meanwhile, open a file with a scanned Polaroid and select the photograph area using the area select tool.
Now, 'Edit', 'Paste special', 'Paste into'
The image will be far too large, so 'Edit', 'Free Transform' and proceed to scale down the image using the corner arrow tool and hold SHIFT at the same time so the image stays in proportion.
Carry on until the image fits nicely, which will depend on the original photograph.
Accept the transformation on the top bar by clicking the tick.
This would look much better if the original image would have been taken from a further distance.
Subscribe to:
Posts (Atom)


